
Explore the fundamentals of styling in Gravity Forms. Then, take it further with advanced CSS styling and other techniques.
Let’s talk styling Gravity Forms. The default styles available in Gravity Forms do a great job of adapting to your chosen WordPress theme, but sometimes, we need more. And that’s probably why you’re here. The process of styling Gravity Forms can seen daunting at first, as there’s a plethora of options available.
So, in this article, we will guide you through the ins and outs of Gravity Forms CSS styling, helping you create visually appealing and functional forms tailored to your site’s unique needs.
We’ll discuss the four primary methods of styling Gravity Forms and delve into some third-party WordPress plugins that can elevate your forms further. Let’s begin the journey to create engaging and visually stunning forms for your website!
Gravity Forms does a great job of inheriting your theme’s default styles. This means, in most cases, your forms should fit right into your existing theme.
With that said, there is room to make your forms shine even brighter. Gravity Forms’ styles are focused on being functional to ensure to ensure they can serve the largest possible audience out of the box. Unfortunately, that means that sometimes they can feel a little… vanilla.
You may find yourself wanting to spice your form styles up to better fit your brand, enhance the user experience, or improve conversations. Let me elaborate a bit more on those benefits.
As you can infer, customizing your forms is a proven tactic to create a seamless, professional, and memorable experience for your customers while maximizing the effectiveness of your online forms.
Now that we’ve established the importance of styling your forms, it’s time to explore the various methods available to customize their layout and appearance.
While there are third-party tools that can further enhance your forms, it’s essential to understand the built-in styling options that Gravity Forms provides.
Let’s take a look at four primary methods for styling your Gravity Forms, without requiring any additional plugins or tools, that can elevate your form design game.
With the introduction of Gravity Forms 2.5, users can now access a variety of layout and styling options directly from the built-in Form Editor.
Previously, making these changes required the use of CSS.
The Form Editor provides a user-friendly way to make simple adjustments to your forms without the need for advanced coding skills.
Let’s take a closer look at some of the changes you can make using the Form Editor.
One of the most notable features of the Form Editor is the ability to create multi-column form layouts. You can easily accomplish this using the drag-and-drop form builder by dragging one form field next to another.
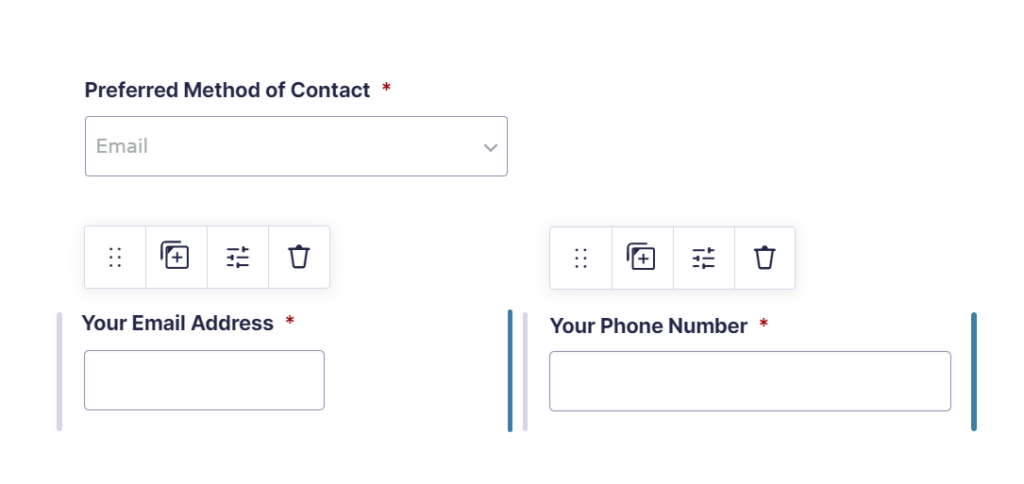
This feature allows you to organize your form fields more efficiently and create visually appealing layouts.
The Form Editor also allows you to make adjustments to the appearance of individual form fields. For example, you can change the form label visibility, adjust the description and sub-label placement, modify the field size, or add a custom validation message.
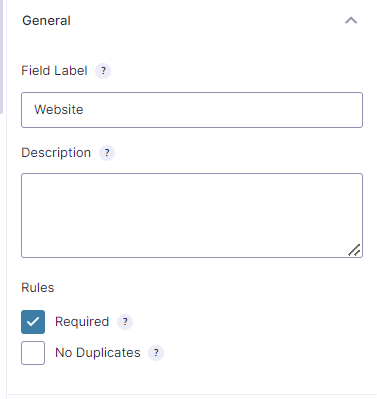
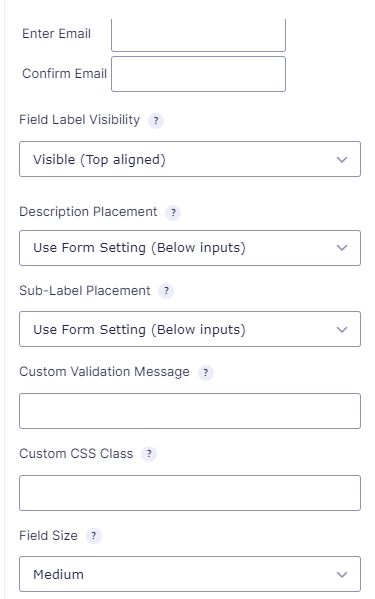
This helps you maintain greater control over the look and feel of each form field, ensuring an optimal user experience specific to each form and field.
While the layout and styling options offered within the Form Editor are quite basic, they provide a solid starting point for users who want to customize their forms without delving into CSS.
However, if you’re looking for more advanced control over the appearance of your forms, read on to explore more advanced methods for customizing your Gravity Forms.
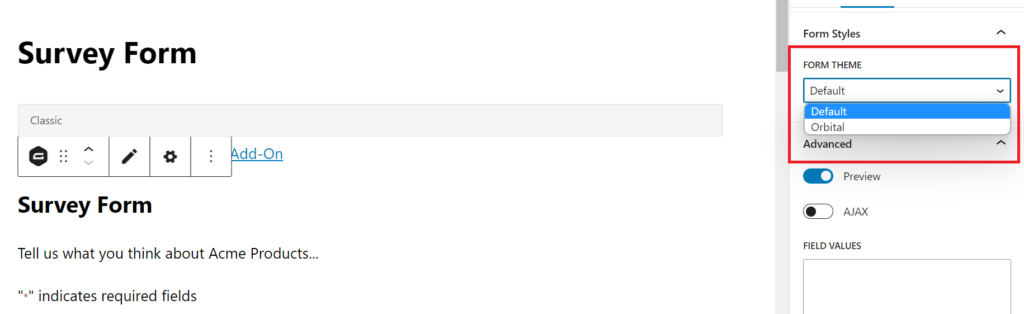
The release of Gravity Forms 2.7 introduced a new feature that further simplifies form styling – Form Themes.
With the addition of the Orbital form theme, users can now style their forms directly from the WordPress block editor without the need for custom CSS snippets.
The Orbital theme offers built-in block styling options, allowing users to modify various elements such as color schemes, background colors or background images, submit button styles, input sizes, and more.
Here’s a short, step-by-step tutorial on how to use the Orbital form theme to style your forms:
With the Orbital form theme enabled, you can customize various aspects of your form’s appearance, including:
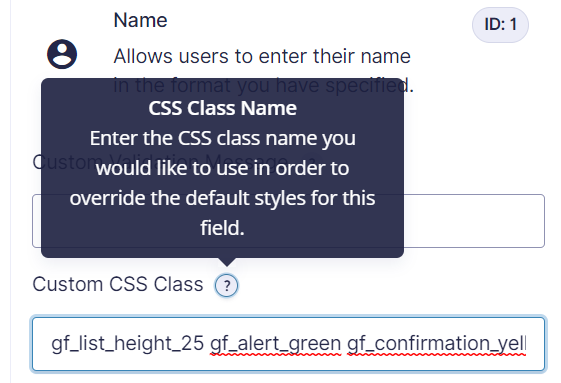
If you’re unsure where to start, check out the full list of Gravity Forms CSS Ready Classes.
To make changes at the form level instead of the field level, select Form Settings from the Settings dropdown in the form editor. Then, add your Ready Classes to the CSS Class Name box under the Form Layout section.
Keep in mind that changes made using CSS Ready Classes won’t appear correctly in the form editor. To preview your changes, save your form and click the Preview button.
For those looking for complete control over their Gravity Forms styling, custom CSS formatting is the way to go. Gravity Forms is designed to make CSS styling as straightforward as possible, with all its elements being adjustable via CSS files. Furthermore, many elements follow logical naming conventions, making it easier for users with less coding knowledge to make adjustments.
For example, all elements have an ID based on a unique form ID followed by a field ID (in the structure #field_xx_yy, where ‘xx’ is the form ID and ‘yy’ is the field ID).
To make adjustments to Gravity Forms using custom CSS, follow these steps:
Gravity Forms offers an in-depth guide on how to use custom CSS to style your forms which is worth checking out if you choose to style your forms with this method. They also provide helpful CSS targeting examples to help you get started.
The most significant advantage of using custom CSS over the other methods in this article is the flexibility it provides for styling your forms.
However, it is also the most complex method. Therefore, if your desired changes can be made using the Form Editor or CSS Ready Classes, we recommend using those methods for a simpler approach.
In addition to customizing the style and appearance of your forms using Gravity Forms’ built-in editor or CSS, you can also make various visual adjustments to your forms with the help of third-party plugins.
Here are a few of our own plugins that can greatly improve the UX of your forms. Each of these plugins is part of Gravity Perks, a suite of add-ons that help you build anything with Gravity Forms.
Automate your forms’ page progression and create animated transitions between pages using this perk. It allows you to improve user experience by making multi-page forms feel smoother and more engaging.
With a few simple settings, you can create eye-catching transitions that keep users focused and encouraged to complete your forms.
Visually streamline the collection of repeatable data with the use of a “nested” form.
This plugin creates a tidy summary on the parent form, making it easier for users to review and edit the information they’ve provided.
Nested Forms can simplify complex form requests, improving the overall user experience and reducing form abandonment.
Improve the style and appearance of your Gravity Forms file upload fields with image previews, file icons, and a tasteful facelift.
This plugin enhances the look of file uploads while including support for cropping, scaling, and resizing uploaded images.
By providing users with a more visually appealing and functional file upload experience, you can encourage more successful form submissions.
While the focus should always be on answering searchers’ questions, the Gravity Wiz suite offers a variety of solutions to enhance and extend the functionality of your forms.
Effectively styling your Gravity Forms is essential for providing a seamless user experience and boosting completion rates.
Thankfully, numerous options are available to cater to your specific needs and preferences when it comes to customizing your forms.
As you consider your needs and the level of customization you desire for your forms, weigh the pros and cons of each method to determine the best fit.
And for those who want more than what’s available out of the box, take a peek at what Gravity Perks can do for you.
It’s time to make your forms work for you and your business. Happy customizing!
Did this resource help you do something awesome with Gravity Forms?
Then you'll absolutely love Gravity Perks; a suite of 47+ essential add-ons for Gravity Forms with support you can count on.